My current laptop has been around for more than 7 years since i bought it on March 2017 and it was based on Kabylake CPU architecture. I had some fun tweaking it in order to work with Slackware since it was considered new hardware at that time with dual GPU (Optimus), my first dual-boot experience with Secure Boot option in the motherboard and also using grub instead of LILO which i have been used to for more than 15 years. It's still working well and i'm still using it for my daily activities, but since i switched to Ryzen-based CPU for my desktop at home and more recently my workstation at the office and both performed really well with more affordable price as well, i'm tempted to switch to Ryzen-based laptop for my future laptop.
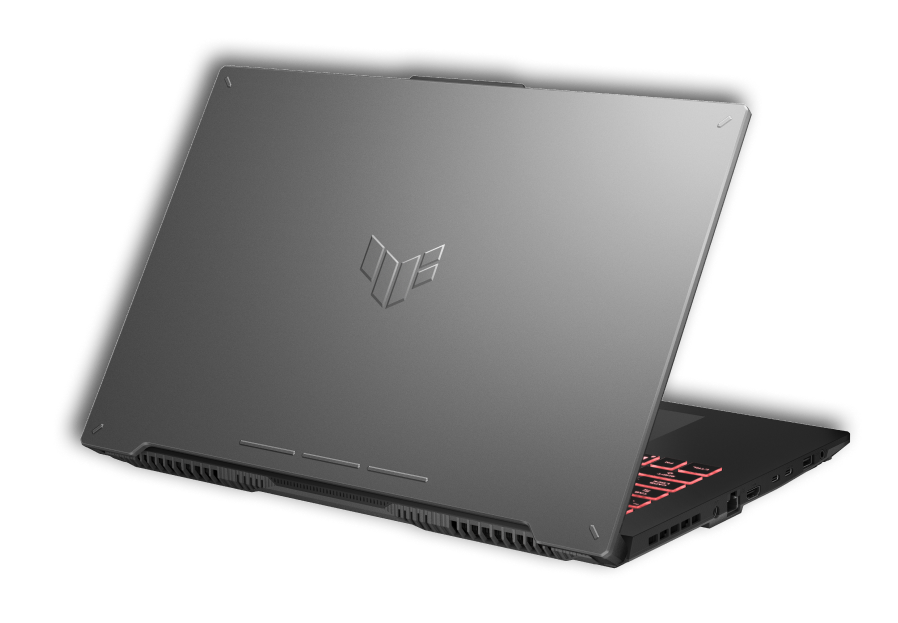
Well, this year i had a plan to upgrade my laptop to a new laptop and i have been eyeing on some products in the market and after one week of researching all the pros and cons, i decided to take on ASUS TUF Gaming A15 (2024). It's a beautiful product with all my requirements are on board:
- Must have expansion slots for memory and storage because i want to put maximum 32GB of DDR5 5600 MHz RAM and also i wanted different storage disk for Windows and my Slackware. Luckily this product came with 1TB of NVMe-based SSD, so i just need to add another NVMe for my Slackware setup.
- Generous of I/O ports. This product came with 1x 3.5mm Combo Audio Jack, 1x HDMI 2.1 FRL
2x USB 3.2 Gen 1 Type-A, 1x USB 3.2 Gen 2 Type-C support DisplayPort™ / power delivery / G-SYNC, 1x RJ45 LAN port, and 1x Type-C USB 4 support DisplayPort™. - Must have RJ-45 jack. This is important for me as i still prefer wired connectivity over wireless for stability. Some products have removed this for the sake of weight and compact size
- I wanted recent processors with AI capabilities, so i'm aiming for Ryzen 9 8945H with 4GHz (24MB Cache, up to 5.2 GHz, 8 cores, 16 Threads); AMD XDNA™ NPU up to 16TOPS
- NVidia GPU. I'm not a gamer but having dedicated GPU is definitely better, so i picked NVIDIA® GeForce RTX™ 4060 Laptop GPU (233 AI TOPs), 1940MHz* at 140W
(1890MHz Boost Clock+50MHz OC, 115W+25W Dynamic Boost), 8GB GDDR6. The AMD Radeon Graphics is also included as part of the Ryzen CPU.
- Good battery life. It came with 90WHrs, 4S1P, 4-cell Li-ion, which is very good compared to other products that i reviewed.
- Silent under heavy load. ASUS is doing a great job on handling the air flows of this product
- Must be durable for my line of work, and luckily it came with military grade certification MIL-STD-810H
This product came with Windows 11 Home installed, so when i got this product, i decided to setup it as soon as possible because in the past, i would need a whole day to setup for each platform (Windows and Linux), but surprisingly, i managed to do it in just few hours.
Once Windows is done, i took my time to prepare the latest Slackware-Current ISO from my local mirror setup at home because i'm using NVMe-based SSD along with newer Ryzen-based processors, so 15.0 might not be a good choice and since i'm already using -current on all my machines at home and workstation, i'm sure that it's a good choice and reduce my problems with newer hardware.
Well, turned out it paid well. The installation went smooth and it was finished in just few minutes and before rebooting, i managed to setup up GRUB instead of ELILO, but after rebooting, it went directly to boot Windows, so i noticed a problem there. It turned out that the GRUB installation was not handled correctly, so i booted again using Flash Drive and i choose boot existing OS and i chose Slackware Linux and from then i followed the same path as before
- Create a new initrd (i know it's no longer used since the generic kernel in -current had all the modules ready, but it's just old habbit and it should be safer, so i ran geninitrd to include all the required modules into initrd file)
- Install GRUB into proper location. The reason it failed during installation was probably because i didn't mount the proper EFI partition from my Windows system so the image wasn't installed properly and didn't overwrite Windows' boot manager. I used this command: grub-install --target=x86_64-efi --efi-directory=/boot/efi/EFI -v
- Update GRUB installation using update-grub script.
![]()
Afterwards, i rebooted and voila, GRUB menu appeared and i went directly to boot my Slackware-Current and man, it was very fast. The boot process only takes like 4s to get the login prompt thanks to the NVMe-based SSD. I started my X session on Plasma 5 and everything is well detected including WiFI, something that often bugged people for days in the past. I don't really configure much on this new laptop as everything is just working out of the box. This is the screenshot from the Plasma 5 system setting.
With basic configuration done, i followed by installing sbopkg to install other packages that i need for daily work and i finished it under an hour or two.
One thing that i still haven't managed to setup is openrgb since my product is not yet listed on their website. It wasn't able to detect my chipset properly so it crashed when i tried to setup the keyboard backlighting, but i don't need that feature anyway. I was just curious about it and i also disabled the backlighting on my Windows setup as well to gain more battery life.
In general, this product works well for me and i'm super happy that Slackware also works fine with this without too much hassle and efforts. I also didn't encounter shutdown issue reported in LQ. If you are looking for a new laptop that works well with Slackware Linux or perhaps with any other Linux distribution (i never tested this yet but i'm sure you should have no issues if you are using recent kernel version), you might want to consider this product on your next wishlist.


 | Genymotion Launcher (Screenshot : Arief-jr) |
 | Image Source From Wordpress.org |
 | VirtualBox Version 5.0.10 |
 | Wireshark With QT5_GUI |